While larger companies are likely to use external HR software or outsource their payroll needs to an accountant, smaller businesses often rely on internal processes. For many companies, Microsoft Excel, or similar tools provided by other software (such as OpenOffice, Google Spreadsheets, etc.), are the standard go-to DIY payroll programmes.
Having a well-established system to calculate your company’s payroll has multiple benefits. Successful payroll operations eliminate mistakes and boost productivity. They also ensure timely salary payments, which is vital for employee job satisfaction. Additionally, building an HR department that takes on the payroll duties guarantees that your company meets tax and compliance obligations.
Depending on savvy payroll administrators who know precisely how to create an in-house payroll system allows your company total control over those expenses. Keep in mind the importance of accurately including the correct deductions and data security and privacy.
Using Excel to handle payroll could be beneficial to your operations, depending on your needs. If you’re just starting out, your company is a manageable size, and you’re looking to keep costs low, Excel could be just the tool.
In addition to the control it gives you, Excel also permits the generation of reports, which can be vital in business decision-making. It is relatively simple to use and super quick to get set up and running.
Check out our step-by-step guide below and learn how to prepare your payroll in Excel.
1. Build a payroll template
To start a successful business, you’ll need a good productivity software suite including a word processor, presentation programme and a spreadsheet for calculations.
To create your payroll, open a new spreadsheet in Excel. This is where you’ll make your salary sheet template.
Once you have applied the steps below and created a basic payroll format, save it as a template and use it for each payroll period.
There are two ways of organising your payroll template. You could either save the spreadsheet and re-use it by saving it with a different name each time (depending on whether you pay weekly, fortnightly or monthly). To do this, open up your payroll template and click ‘Save as’ to create a copy with a new name every time – i.e. Payroll_January_2021, Payroll_February_2021.
The second method involves adding tabs within a single Excel file. This could be divided to best suit your needs; you could add a new tab for each month and then create a new Excel file with monthly tabs for every year. Similarly to the first method, first create a payroll template, click ‘Save as’ and add the year or period you will be using this spreadsheet file.

It is essential to know that within Excel, there are columns, rows and cells. The columns are indicated by letters A-Z, the rows by numbers and the cells by their respective combination of the column letter and the row number (e.g. A1, B2, C3).
This is helpful to understand when introducing formulas to make calculations. The cells will contain the values that will make up your payroll sheet.
To get started on your template, you’ll need to set up the columns. As a basic template, it is advisable to include the following columns:
- Employee name:Full name of the employee, as indicated on their ID
- Pay rate:Standard rate of pay per hour, in the appropriate currency (€, $, £, etc.)
- Total hours:Total amount of hours worked during the pay period
- Overtime pay rate:Standard rate of overtime pay per hour
- Overtime total hours:Total amount of overtime hours worked during the pay period
- Gross pay:Total amount of wages before deductions
- Income tax:Amount of wages to be deducted for government taxes
- Social security/National insurance number:Amount of wages to be deducted for state benefits
- Other deductions:Amount of wages to be deducted for other reasons
- Gross deductions:Total amount of wages to be deducted from gross pay
- Net pay: Total amount of wages to be paid to the employee

Meanwhile, in your Excel salary sheet, you can format with letter sizing, colours, bold, italics, aligning and so on, as you would in a word processing document to fit the style you want.
2. Input base information
With your columns now ready, you can start introducing the base information. This includes the names of employees, pay rates and overtime pay rates as indicated above. This data can be classified as static as, mostly, it is unlikely to change regularly.
This can be ready-filled manually in the template for when you’re ready to use it. Where information could change from time to time, such as pay rates, it can be modified by hand when necessary.
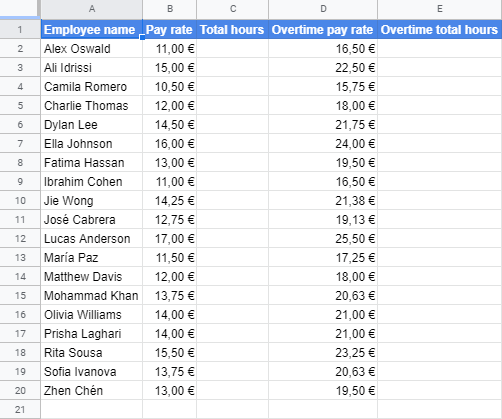
Alternatively, you can store the static data on another spreadsheet, tab or database and import it where needed, to maintain updated information and automate processes. To do so, you may need to extend your excel skills to understand searching functions; these are known as VLOOKUP. To develop your knowledge, you can always refer to Microsoft’s free excel training, which will help you adapt the programme to your payroll needs.
If you choose to create a database spreadsheet from which you pull the relevant details, be careful not to eliminate any information until the entire tax year is complete. If you remove the data regarding employees who have left the company, this could cause errors in your payroll calculations. It will also likely affect any reports that you establish.
Other information indicated should be introduced as it becomes known. For example, the total amount of regular and overtime hours may change per pay period and will need to be submitted each time manually.

However, the gross pay, deductions and net pay will be informed by their respective formulas, which you’ll see in the next step.
3. Introduce formulas
Now that your base information is set, you will need to add in the formulas to determine the final pay and deduction amounts. This can be done in Excel by using the SUM functions. These replace basic mathematical equations which can automate your calculations.
Gross pay
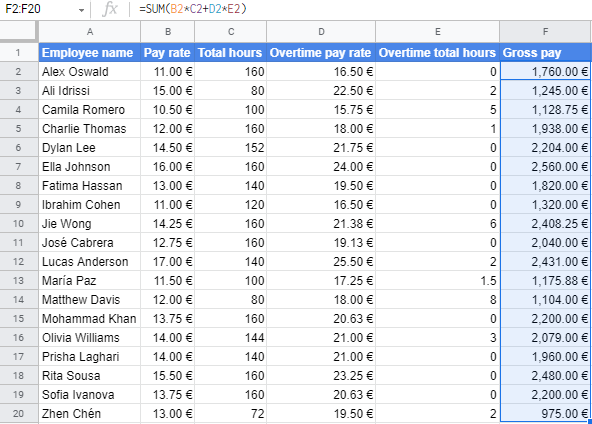
Firstly, you’ll need to multiply the regular hours (C2) by the corresponding pay rate (B2), do the same for any overtime hours (E2 and D2) and add these together to find the gross pay amount. This calculation would be represented in excel with this formula: =SUM(B2*C2+D2*E2) to give the overall wage before deductions. The asterisk symbol (*) is used to represent multiplication in excel formulas.

Once you have the formula, which will be the same for all employees, you can apply it to the whole column. To do this, simply put your cursor over the square that appears in the bottom right-hand corner of the cell box and drag it to the last row. You will see that the formula for each gross pay cell has been adapted to the information in the corresponding row.
Income tax
Income tax can vary depending on different factors. It is usually calculated as a percentage of what an individual earns. You will need to know the specific tax rate that applies to each employee - this can be found on their tax forms.
There are different tax brackets; when you earn between certain amounts, you are subject to a specific percentage. However, bear in mind that there are exceptions and allowances which affect the final income tax rate on an individual level.
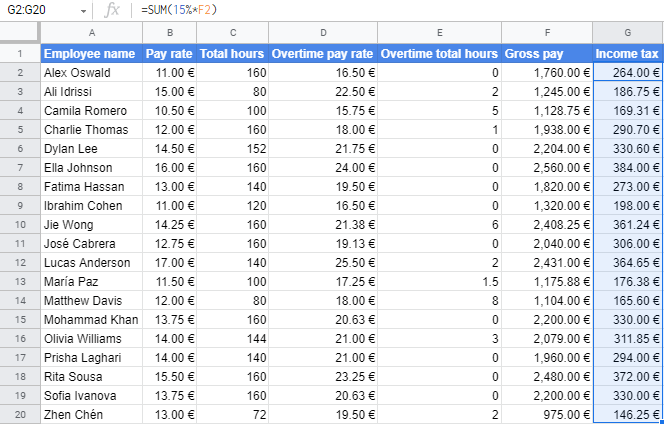
In this example, we will assume that there is just one tax rate for these employees at 15%. In this case, you’ll need to apply this rate and find out the amount in the relevant currency by multiplying the percentage by the gross pay.
This will be represented in a formula as =SUM(15%*F2). This result will give you 15% of the gross pay and is the amount that should be deducted for income tax.

To apply this to the rest of the employees, drag the formula down to the last row. This will apply 15% to the respective gross pay for each individual.
If you find that you have varying tax rates to apply, you could do one of two things. The first would be to group employees by their tax rate and apply the formula as we have done. The other possibility is to add the tax rate to your database sheet and use the more advanced IF functions to apply the applicable rate to each individual. Often, the tax rate is reflected by a specific code which could be helpful in your calculations.
Social security
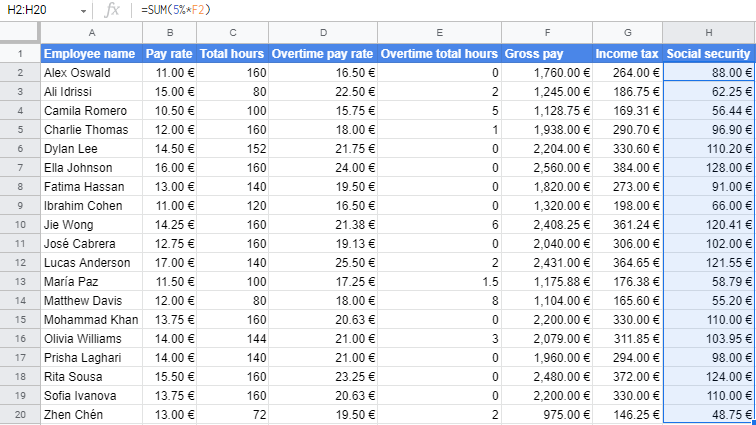
Social security tax can also vary depending on where it is being applied and how much an individual earns. Generally speaking, it does not vary as greatly as income tax and is usually quite similar for most workforce. For the sake of our example, we will apply a standard rate of 5% to all employees.
To determine the amount of social security that should be deducted from the gross pay, you’ll need to use a similar basic formula as the income tax calculation. You should multiply the 5% social security tax by the gross pay using the formula =SUM(5%*F2).

To apply this calculation to the rest of the employees, you’ll need to drag the formula to the end of the applicable rows. This action will apply the 5% social security tax to the respective gross pay for each individual.
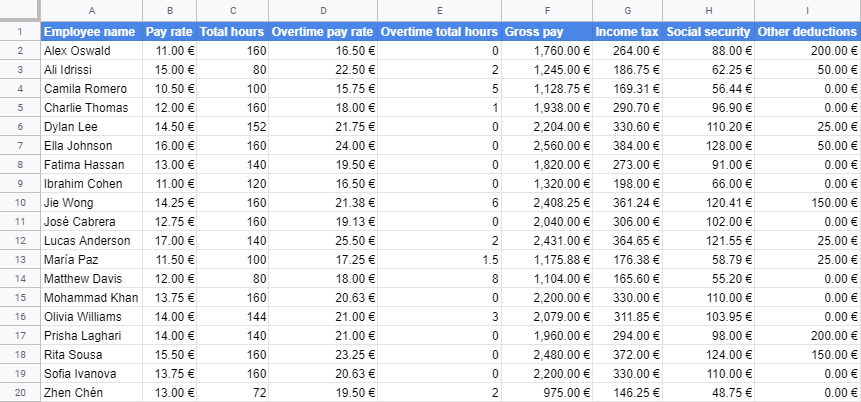
Other deductions
The other deductions that should be considered include health insurance, company benefits, other applicable taxes, pensions or savings plans, shares or profit-sharing schemes, debt payments, trade union fees, child support payments, etc.
These are all extra payments that could be deducted directly from an employee’s paycheque. These will most likely vary for each individual, although some may be applicable to a group of employees, such as specific company benefits or insurance.
In this case, you may want to add additional columns to be able to include and specify the various deductions. Some may be best calculated using formulas similar to those for income and social security tax. Others may simply need to be introduced manually. In our example, we have added some random amounts relating to a generic other deduction.
Gross deductions
Once you have all the deductions calculated and introduced, you can work out the total. You must add up the various deductions with the formula =SUM(G2+H2+I2) to get this amount. This includes the income tax, social security and other deductions from our example.
In this case, write the formula as =SUM(G2:I2), which will add all cells from G2 to I2 along the row. You can either type in the formula or place the cursor on the first cell and drag until the last cell you wish to include.

With this calculation, you’ll have the total deduction that will need to be subtracted from the gross pay.

To apply this to each line of your payroll spreadsheet, drag the formula down to the last row.
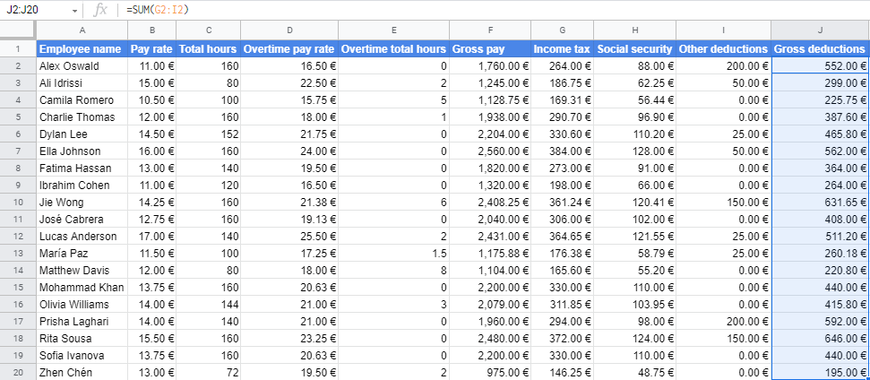
In your payroll spreadsheet, ensure to include any additional deductions you need to consider.
Net pay
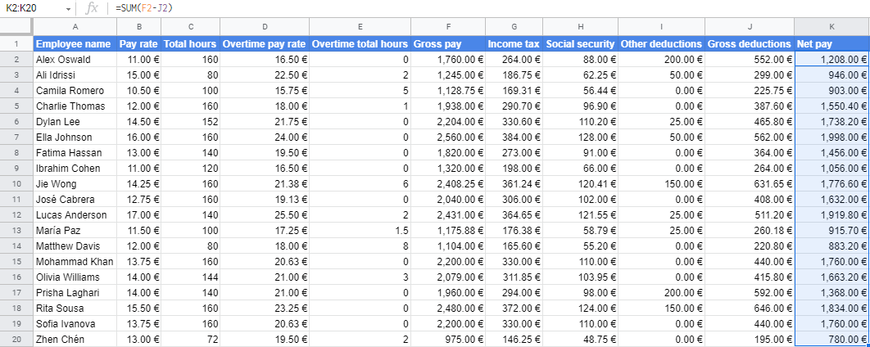
To finalise the calculations of your payroll, you must find out the net pay. This will be the amount paid to the employee as wages at the end of the pay period. The net pay is computed by subtracting the gross deductions from the gross pay. The relevant formula in our example would be =SUM(F2-J2).

With this calculation, you will need to do the same and drag to fill the rest of the rows to finalise your salary sheet with the correct net pay for each employee.
4. Customise your template
This example is a fairly basic but standard payroll system. For your use, you will need to personalise it to fit whatever extras your company applies.
You may want to add a row at the end of the sheet to include totals. It may be beneficial to your business to know the overall hours and overtime worked and the pay and taxes paid in each period. Calculating the totals will also allow you to generate better reports and use these to inform business decisions.
You may also need to include other columns that detail additional information that is essential to your payroll. This could include holiday or sick pay, with the number of hours and pay rates, if this differs from their base rate.
Another remuneration aspect to consider is if your business applies any bonuses or commissions and reimbursements for expenses. If this is the case, check whether these additional bases of pay are subject to the same tax and deductibles.
Another way you may wish to adapt your payroll from this template is by including further information regarding the individual employee. This could be an employee number, if applicable, their department or job title. These may also determine how you choose to organise your payroll.
5. Use your spreadsheet efficiently
Once you’ve saved your template, you can begin to use the spreadsheet monthly or weekly as per your payroll needs. You can use one file with various spreadsheet tabs (one for each pay period), or you can copy and re-use the template each time.
If you choose to use a different file every time, you should remember to include the dates for the pay period and save it with a specific classification.
It is also essential not to forget to adapt any information as it changes and review the excel payroll carefully and diligently before confirming.
Excel is a convenient and affordable solution for basic payroll needs. It may not be the best tool for large enterprises due to the manual labour involved, but if you’re part of a smaller business looking for a quick fix to get a hold on your employee finances, this system could be the answer.
Can you think of other useful tips for running your payroll in Excel? Let us know in the comments section below!
This article is an updated version of an earlier article originally published back in 2017.
